Monday, April 18, 2016

Windshield Part 2

April 17, 2016 -

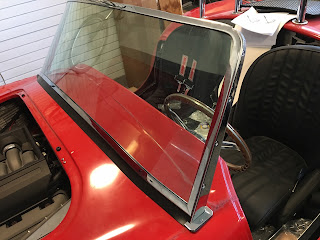
  I wish this advice was in the manual, but in order to bolt the windshield on the driver's side you need to remove the fuse panel. That made it a lot easier. On the passenger side it's more difficult, especially if you have your engine ECU and a windshield wiper motor mounted in this area like I do. And definitely try not to drop washers and nuts in the dark spaces between the body and the frame that you can't see. Anyways, the trick to the passenger side was to put your arm and socket or wrench behind that ECU. Yes you will still have to tighten it from 1 foot away moving one click at a time without being able to see what you are doing and you might even have to lay superman style across the engine like I did, but you can do it. Here it is all tightened down.


  I forgot to mention, in order to drill the holes in the side mounts of the windshield, get a step drill bit that looks like this.


  It works *way* better than your conventional bits!
Monday, April 11, 2016

Windshield Part 1

April 10, 2016 -

  After attaching the windshield side supports, I was able to get help fitting the windshield into the car and see how they lined up with the frame mounts for the windshield.  Of course the windshield side mounts were about 3" - 4" too long and prevented the windshield from sitting down on the body.  After pulling it back out, trimming the windshield side mounts with a Dremel and a hacksaw it fit in nicely.  This is to show you how much had to be trimmed off on both sides.


  Unfortunately the slots in the body aren't quite far enough forward for the side supports to line up with both holes in the frame mount on each side.  I will need to expand those slots in the body just a little more forward. Here's a shout out to my fiancee and helper Michele for helping me fit it!


Turns out the windshield moved slightly between marking the driver's side and then going over to the passenger side. So I decided to just drill the driver's side, bolt that side in, then mark the passenger side. Turns out the sharpie is pretty easy to wipe off the chrome finish.


Body Dash

March 10, 2016 -

  I haven't gotten a lot done lately. Still wrapping up house build punch list items but I also got another case of the frustrations when the passenger side windshield support wouldn't fit in the slot in the body because it was obstructed by the dash aluminum. I spoke to Factory Five and some others and there are ways to adjust the body. Some that have gone before me highly recommend trimming the body away from the dash covering regardless, so that the fiberglass body isn't digging into the dash. I trimmed off about 1/4" using a Dremel.


  This created a lot of fiberglass dust which is blocking the view of the gap I created between the body and the dash but you can get the idea here.


  I should have done this at the beginning of the project for anything related to cutting the fiberglass but I invested in a decent respirator for this kind of work. I highly recommend it.


  In the end, this didn't help the body move at all and the trick to getting the windshield to fit in the slots is just to lengthen the slots themselves. (More chances to wear the respirator!)