Monday, December 28, 2015

Hood

December 27, 2015 -

  I put together the hood hinges and mounted the hood today. Yesterday I put in the 8 of the shorter rubber bumpers to hold the hood off the body. I used screws and nuts there so they can be removed for paint. The hood hinges took some extra washers from the diagrams in the directions because with just one they were very loose. I needed help holding the hood while I riveted it to the hinge. Thanks Michele! I probably should have done the riveting off the car and attached bolts cause you end up having to widen a rivet hole while someone is holding it. (Sorry Michele.) At this point the piston struts do a nice job of lifting the hood but when it's down flat the front is up a little. I think I need some fine tuning of the hinges to get it to sit flat.


  Note from the last blog post, I did get a new flasher at the local auto parts store for $6 and it works although it flashes a little faster than the factory five one which is fine I think. For some reason now the turn signals aren't working.... so that's something to track down next. (Subsequent note; turns out the turn signals work just fine. The key needs to be in the ON position for them to work. This is the same position that has the fuel pump running. All the other lights seem to work in other key positions so I'm not sure why it's this way but I guess you don't need turn signals if the car isn't on, whereas you might need hazards.)

Sunday, December 6, 2015

Headlights

December 6, 2015 -

  I have finally moved into the new house and gotten most things where I want them so there's no excuse to not be working on the car now.  I had been stuck for so long on the headlights not working I was shirking from going back and debugging it. I spent a little time on the phone with Factory Five and they gave me some great pointers.  First they made me realize that what I had thought was the headlight high beam switch was the hazard switch and that when I flipped it and my turn signals got brighter it was the second filament in the turn signals coming on and not flashing. They said swap the hazard and turn signal flashers and viola, my hazards flashed and my turn signals didn't work. So they're sending me one more working flasher. The flashers are the shiny cylinders in the fuse box.


Next, the headlights won't work at all unless there is a high beam switch installed. The switch is up or down and one position completes a circuit with the brown high beam wire and high beam indicator (blue dash light) and the other position completes a circuit with the red low beam wire. I didn't even have a hole in the dash for this switch! So since I had already laid other switches out uniformly and this would clearly be a one off if it were anywhere within reach I decided to put it inside the wheel.  It isn't in the way of my hands and I can switch it by extending a finger from the wheel without taking my hand off the wheel which I thought was nice.


Monday, September 14, 2015

Battery Post Clamp

September 14, 2015 -

  Long time and no posts. Sorry. I've been building a house and it is about a month away from completion so that's been taking up most of my time. I have done a few more electrical things.  The brake lights weren't working and so I found that the switch that the brake pedal arm is suppose to depress needed to be moved closer to the pedal arm so that better contact and button compression was made.  I also found some weather pack connections not all the way in and making contact.  I've also learned to check fuses. (A fuse being blown kept some lights from coming on.) Lastly, there was also a poor connection in the brown plug from the main wiring harness to the front wiring harness. I thought about permanently connecting those wires with a butt connector but someone told me that it might be useful to disconnect those for future body work.
  Today I put a nice battery cable clamp on the positive cable.  This fits the battery post well and has a nut to loosen for easy removal. Previously there was an ill-fitting ring that was crimped to a cable with a shutoff switch someone gave me. The shutoff switch is nice but that terminal ring wasn't. Here's the new setup:

  The negative terminal already had a nice connector with the grounding strap that goes to the frame. I taped up the steel bar that holds the battery in the battery box in case one were to accidentally make contact there using a wrench to loosen the clamp nut.

Thursday, June 25, 2015

Dash Supports

June 24, 2015 -

  I've been working to fit a dual USB charger into one of the support braces for the dash.  There is a rectangular hole in the braces and it was just a little too big for the Blue Sea Systems USB charger that I got on Amazon.  So I cut two scrap pieces of aluminium and riveted them on to make the hole smaller.

  Then I decided to use some spare dash cover material to cover up the part of the aluminium that one might see.  I think carpeting will cover up the vertical part that attaches to the frame.


  And because it's fun (and to test the fuel filter relocation) I went for a brief test drive with Michele's mom Terry.


Tuesday, June 2, 2015

Test Run

May 31, 2015 - June 1, 2015 -

  With the seat heaters wired in, the seats bolted in, and no wires dragging around under the car I thought it was time for a quick test run.  It was a pretty hot day so I forgot to test the seat heaters.  Here's Michele and I backing out:


  I think she was happy there was no pushing the car involved in this outing.  However we did hear a brushing noise from the rear passenger area.  (By the way this was a trip just circling the block.)  I saw afterwards the tail of the strap holding the fuel filter was touching the rear passenger tire and I think on bumps the filter itself rubbed the tire.  So I trimmed the strap and moved the filter (again).  Fortunately I saved some of the 5/16" fuel hose and had a spare piece that was long enough to move the filter back as far as it can possibly go.  It should be out of the way now but if its not I will have to engineer something up.  I would say the instructions weren't clear about moving this to the absolute rear but then again maybe they didn't expect as big a tire as I have (although I think people are often putting these wide tires on this car....)

Thursday, May 21, 2015

Driver's Seat

May 20, 2015 -

  It's been too long. I have been out doing other things with the nicer weather I guess. Yesterday I finished bolting in the driver's seat. This was a bit of a job since I put in seat adjusters and had trouble working around the big 4" frame tube. I also had to do some hole drilling and wire soldering for the seat heater. Now I just have to ground the seat heaters and put in a new fuse box for them since the existing fuse box is full.


Tuesday, March 31, 2015

Passenger Seat

March 29, 2015 -

  I bought another box of hush mat to add a little more in the cockpit and to do the trunk later.  I found some cheaper on Amazon but didn't notice it was the black finish and not the shiny metallic finish.  I guess it doesn't matter if its getting covered with carpeting.  After that I mounted some slide rails to the bottom of the passenger seat.  This will probably never be adjusted but I think its a good practice run for the driver's side and this way the two seats are at the same height.  Speaking of height, my excellent advisor Dale recommended I raise the front of the seat 1/2" - 1" to make it more comfortable.  I stacked a couple washers and rubber washers as cushioning in the front of the seat where it meets the slide rail adding about 3/4".  Lastly I routed the cobra seat heater wiring through the transmission tunnel and made a hole in the side of the tunnel for the seat heater switch just above the range of the emergency brake. I haven't wired the seat heater to power yet cause I need to put a 10 Amp fuse there and instead of doing it inline I just bought a 6 fuse panel so that I can have fuses for both seat heaters, the USB charger, the fog lights, and anything else I might think of... more cockpit floor lighting or trunk light?


Friday, March 13, 2015

Transmission Tunnel Cover

March 12, 2015 -

  I put in silicone and rivets to attach the transmission tunnel cover.  I see now why this should be done before the dash goes on.... My drill can't quite fit under the dash to drill holes for the front.  I think I can find a slimmer drill or a right angle for the chuck....  I did find that the cover piece fit better going over the side panels. I think the manual has you tucking the cover under them but it just seemed too wide to me so I went over the sides.


Monday, March 9, 2015

Transmission Tunnel Cover

March 9, 2015 -

  I spent the weekend recharging the dremel and cutting an oval patch panel from the spare aluminum I had from the other inner driver's side footbox panel.  (The Coyote engine forces you to use the bent footbox panel for more engine room.)  I decided to put the oval patch underneath but may regret that when I try to install the piece because the part of the patch will be between a frame bar and the panel.  We will see tomorrow how that goes.  Here's the tunnel cover with the original oval patched, two holes cut for cup holders and a small box cut out for the mid-shift I have in the TKO transmission.


Thursday, February 12, 2015

Oval Patch & Driver Footbox

February 12, 2015 -

  Today I put the skinny oval patch on the passenger side F panel in the engine compartment.  I probably should have done this sooner but it all worked out.  Honestly I didn't know what this patch panel was for until I was on the phone with Factory Five for something else and I asked.  I guess it is either missing from the manual or I just skipped over it somehow.  The hole is in the F panel for older model Fords used in donor setups where the radiator hose is somehow routed through there.  I didn't need to route the hose through there so I patched it up.


  While I had the drill and pneumatic riveter out I decided to clean up the "modified" driver footbox.  As you might recall I popped a section of the lower inside footbox out further into the engine compartment.  Today I made the aluminum sheet metal meet up with the side of the transmission tunnel.  I had to use the 1/2" long rivets to really pull this metal together but I think it came out nicely.  I also cleaned up the corners of the upper piece still pointing towards the driver.  You can see at the very top there's a little gap I still need to fill....


  Oh I should also mention, I've been working on the fuel pressure regulator slow leak I have.  All of a sudden the fuel pump stopped working. I started checking all these fuses and the plug that goes to the pump driving myself a little nuts.  It turned out the inertia switch will go off with a decent bump.  The car doesn't have to go upside down. So all you need to do is check the red button and push it again. Good to remember if it ever happens out on the road from a speed bump or something! 
  Under some better light I can see the fuel is coming from the top lid of the regulator.  I spoke to Mallory and they said I needed a 9/64" allen wrench to tighten the tiny bolts on the top of it.  Of all my 30 or 40 allen keys I didn't have 9/64" so I had to order that. It should arrive Saturday.


Wednesday, February 4, 2015

Steering Column Bezel

February 3, 2015 -

  I haven't posted in a while because the things I've been doing are small and haven't lent themselves to any good photos. I've put a bunch of dynamat for sound and heat shielding in the cockpit and put a rivet in here or there.  I took out the fuel pressure gauge that was leaking and replaced it with a plug which still leaked.  So then I took out that plug and another connector and used teflon tape.  I know you aren't supposed to use that for fuel lines but there was no thread damage (i.e. I hadn't cross threaded the connections) and the thread sealant just wasn't cutting it.  You can't have fuel leaking I'm pretty sure.  I think the tape fixed it.  I also tried on the aluminum cover on the transmission tunnel and found where I had to cut a new hole for the forward shifter I have.  I also put on the steering column bezel that my sister gave me from Finish Line.  I think it looks pretty sharp.  Thanks Meredith!


Thursday, January 15, 2015

Transmission Plug

January 15, 2015 -

  There is a rubber plug in the driver's side of the Tremec TKO transmission that plugs a whole which is meant for the mechanical speedometer pickup/sensor.  The rubber plug is for shipping and should be removed for driving the car.  If you are using the electrical one on the passenger side then this rubber plug should be replaced with a steel one.  I bought a steel plug from Mike Forte.  In the following photo the rubber plug is the black round thing with the vertical tab running across it.  Note that the black bolt immediately to the right is something I had to buy to hold in the new steel plug and I just had it placed there for safe keeping.  the bolt is a 1/4 x 20 x 0.75 long bolt.  (I opted for the harder steel one which is better for auto uses.)


  Below you can see the metal plug taking its place which has a tab on the right with a hole that lets the bolt tighten it down.


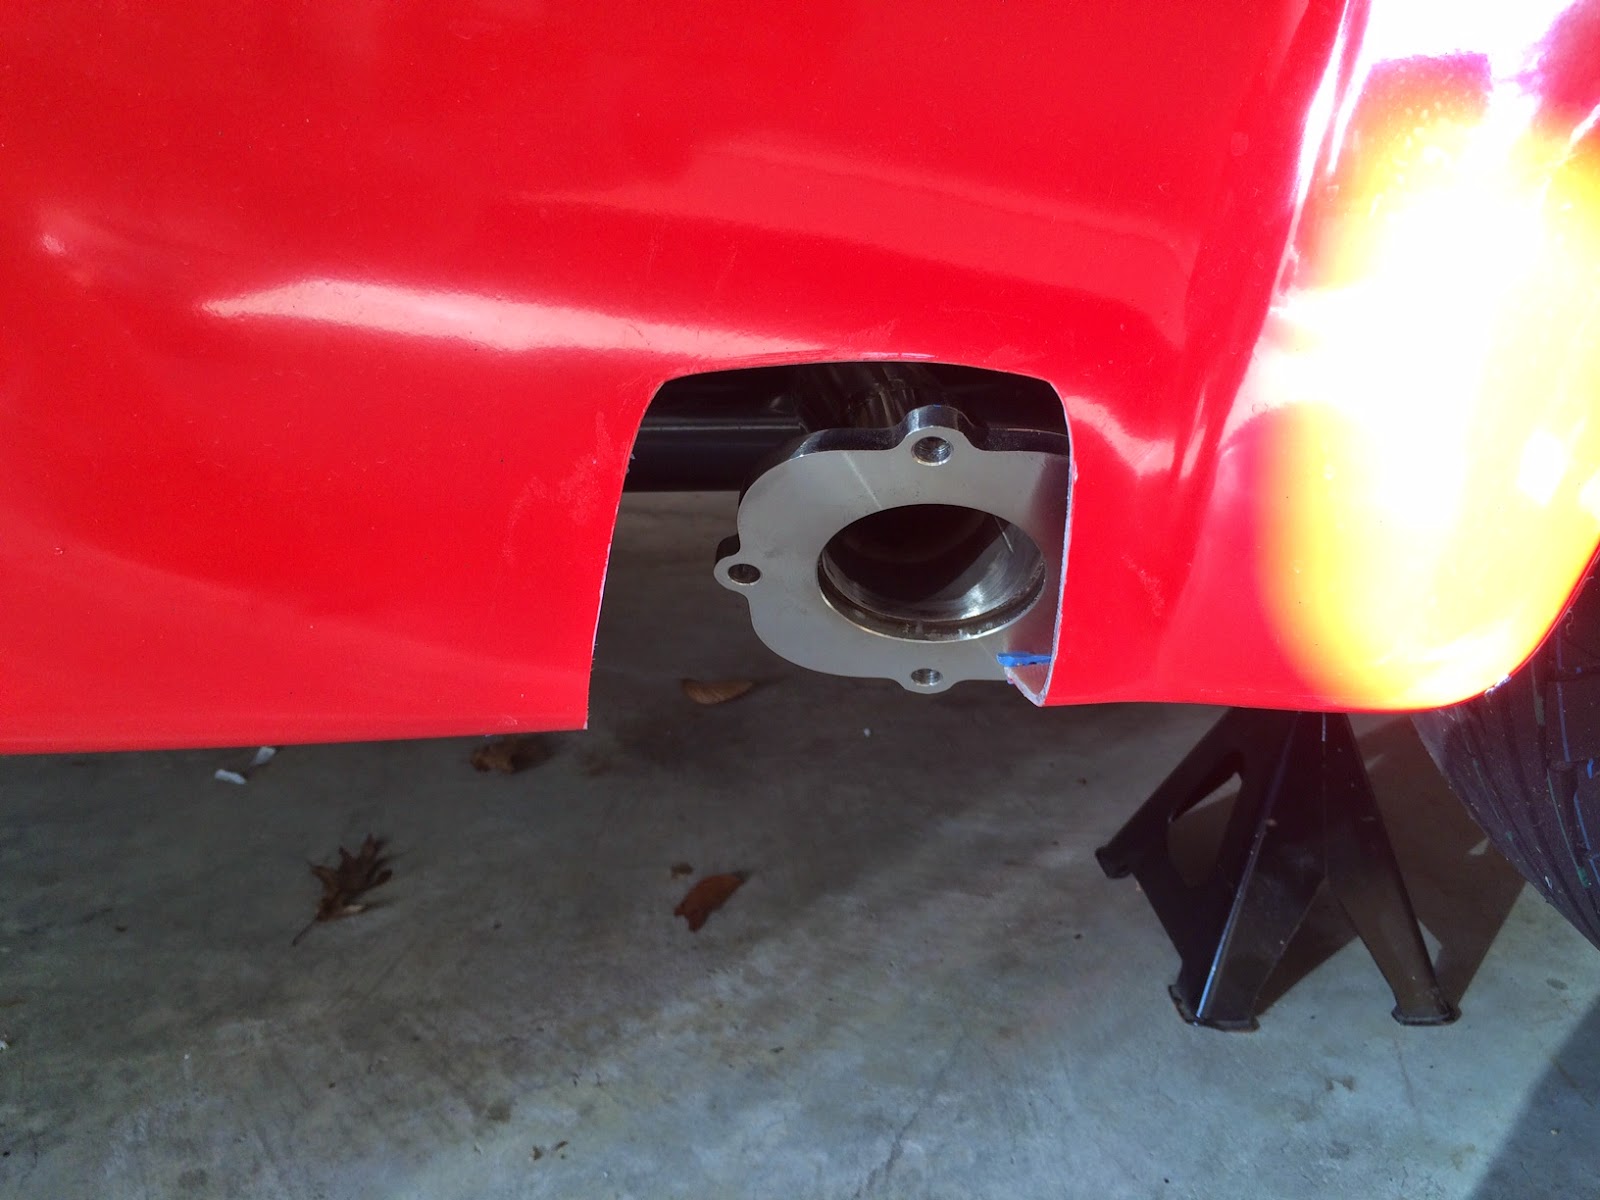
  Something else I thought I would play with is seeing if I could move the passenger exhaust tube that connects to the header so that it would line up better with the body cutout.  Here is is when I put the body on:


  Here it is after a little fiddling.... An improvement I think.


Monday, January 5, 2015

Fuel Pressure Regulator Plug

January 5, 2015 -

  I had fuel leaking out of the fuel pressure regulator on the front port where the gauge was attached.  It was only a slow drip but fuel in a hot engine bay would be bad.  It took a while figuring out what the right size fitting is but it is 8AN. I bought a 8 AN plug on Amazon for 3$ that was a Jegs product.  I think I might even go back to my original fuel pressure regulator post and update it to state the size since this was so hard to figure out.  I haven't run the engine yet to leak test it though....


Small Lights

January 4, 2015 -

  I put on some of the smaller lights today.  Its not quite as easy as you'd imagine.  Even if you've had the factory cut the holes for them, the bolt holes probably aren't in the right place and you'll need to file them out so that the lights' bolts do fit.  The tail lights, particularly the driver's side, can be a little tough to screw the nut on since you have to reach behind the body in a tighter space between the body and gas tank and you can't see anything. Lastly, the outer ring on one of my turn signals seems to be loose and I'm not sure how to tighten it.


Friday, January 2, 2015

Trunk

January 1, 2015 -

  With some help from Michele I got the trunk put attached.  I'd strongly recommend another hand with the trunk as it makes it much easier having someone just hold the fiberglass while you attach it and also hold it while you have to keep opening and closing it to make adjustments to get it to fit.  I didn't file very much off the edges as I'm going to leave the sanding and bodywork to the body shop when they do the final paint job. I'm just looking for a rough fit.  Here's Michele helping out:


  Michele wanted one of me.  Also, this is the new garage that is well lit and warm!


  The trunk handle is nice once you get that on so you don't have to lift the trunk hood by the hole.  The lock can be a little sticky so be patient.


  I wasn't sure about the latch pin.  It goes through the hole in the fiberglass which you can see below, but then is supposed to go through a hole in the frame but this is blocked by the aluminum panel already in place. I'm dreading the idea of having to drop the gas tank again to get this pin in, so I thought I would stop and ask around about this before continuing.