March 31, 2014 -
A few people told me the clearance I had on that drive shaft turning by the frame was cutting it too close so I bought some more washers. (I think I have 1/4" or maybe 3/8" clearance now.) Of course, jacking up the transmission meant I had to remove the shifter again. And after putting in two more washers (for a total of 5 on each transmission mount bolt) the shifter no longer fit under the transmission tunnel cross bar. This is why I think a lot of people cut this bar. If someone reading this is going to do a midshift, just cut it from the beginning. It'll make installing your engine a piece of cake and jacking up the transmission easy as well. I felt that since I had gone to all this trouble to keep it though, I might as well go the last mile. So I filed the frame cross tube down from underneath for about 2 1/2 hours. Filing steel isn't easy. Is my car mildly stronger laterally? Yes. Was it worth it? Probably not.
I also took off the passenger side header after having no way to tighten the rear lower inside nut. I learned from emailing a generous builder who has came before me, that is a stud that needs to be removed and replaced with a bolt. He is actually going to mail me a few of these special bolts. Why doesn't Factory Five's manual tell you to do this? I don't know. Incidentally I got the driver's side header on by taking the engine mount off before the engine went in and tightened the header on all the studs. I could only install the engine with one header on though and thought the driver's side was the tighter space side.
Monday, March 31, 2014
Engine
March 28 - 30, 2014 -
Not a lot of pictures to show because I have only been re-doing things I've already posted about. After the driver's side header hitting the footbox on the last engine install, Factory Five told me they hadn't sent me an engine mount spacer that only goes on the driver's side. I got the part Friday and pulled the engine out myself Friday and installed the spacer. Saturday my dad and Dave helped put the engine back in and the spacer not only did the trick for the header but is probably all I needed for the top of the engine to fit just fine too. Oh well.
Next up was the drive shaft. It's forward knuckle (universal joint) was hitting the frame as it rotated by. I ended up putting some washers and a longer bolt in and got 1/8" clearance but I think I will head back to the store and put in more washers for a little extra room. That rubber mount may compress over time.
Friday, March 21, 2014
Accelerator Pedal
March 21, 2014 -
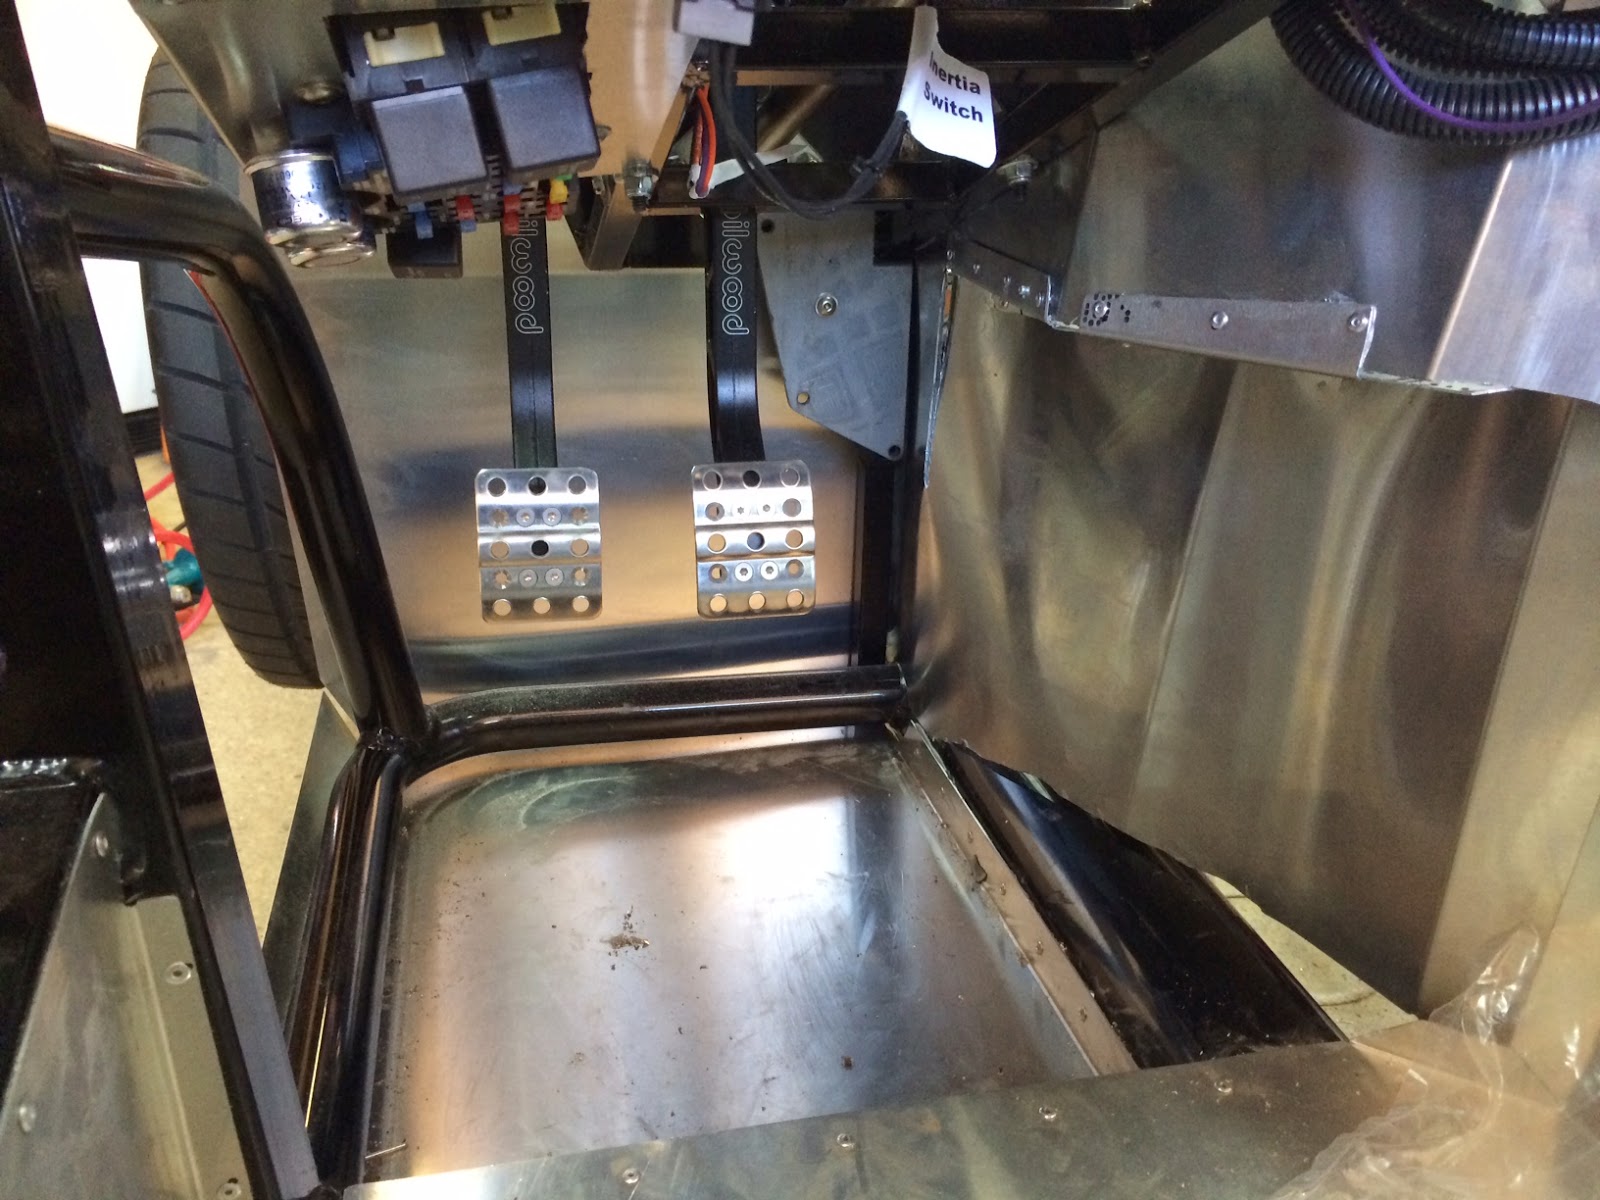
When you first open part one of the Coyote installation manual from Factory Five, there are a whole bunch of pages explaining how to put in the accelerator pedal. It made it seem a little intimidating and I think I felt like I had put it off. I've learned in this project you have to get to everything so don't put things off or procrastinate. And once you are in the job it doesn't seem as hard as it did before starting. Anyways, the pedal seems like a big job because you need to cut the Coyote pedal off and merge it to the steel Factory Five pedal which you have to cut in half too. I guess this is because you need the narrowness of the Factory Five pedal (and I suppose it looks more historically accurate for the car?) but you also need the electronic sensing and sending hardware in the upper part of the Coyote pedal. Drilling through the Coyote pedal's plastic webbing just to trim back webbing was a little awkward and sometimes it helped to use the Dremel. There was also a part where I had to clamp the two pedals together to test the fit and I needed a small clamp that would fit in between the pedal arm and the footbox wall. I borrowed one from Jeff. Thank you Jeff! Here you can see the finished pedal:

When you first open part one of the Coyote installation manual from Factory Five, there are a whole bunch of pages explaining how to put in the accelerator pedal. It made it seem a little intimidating and I think I felt like I had put it off. I've learned in this project you have to get to everything so don't put things off or procrastinate. And once you are in the job it doesn't seem as hard as it did before starting. Anyways, the pedal seems like a big job because you need to cut the Coyote pedal off and merge it to the steel Factory Five pedal which you have to cut in half too. I guess this is because you need the narrowness of the Factory Five pedal (and I suppose it looks more historically accurate for the car?) but you also need the electronic sensing and sending hardware in the upper part of the Coyote pedal. Drilling through the Coyote pedal's plastic webbing just to trim back webbing was a little awkward and sometimes it helped to use the Dremel. There was also a part where I had to clamp the two pedals together to test the fit and I needed a small clamp that would fit in between the pedal arm and the footbox wall. I borrowed one from Jeff. Thank you Jeff! Here you can see the finished pedal:
Engine Back In
March 18, 2014 -
My friend and neighbor Damon came over in the evening to help me get the engine back in. I actually got it pretty close on my own, but in the end needed a hand for the final fit. There is both a bolt and a "nub" that should both fit in the engine mount bracket on the frame and getting them lined up on both sides was challenging but we did it. Thank you Damon! With my angle grinding on the edge of the frame plate that is the front of the driver cockpit area and moving the top of the driver's side inner footbox panel inwards, the upper part of the engine now has the clearance it needs. The driver's side header is touching the footbox but I think that is because I have two layers of dynamat there on the outside. If I remove the dynamat at that point and put some on the inside I think that will be alright.
.JPG)
Even though it was something like 10pm, I was excited to have this in so I kept going and put on the drive shaft which connects the transmission to the rear differential.

My friend and neighbor Damon came over in the evening to help me get the engine back in. I actually got it pretty close on my own, but in the end needed a hand for the final fit. There is both a bolt and a "nub" that should both fit in the engine mount bracket on the frame and getting them lined up on both sides was challenging but we did it. Thank you Damon! With my angle grinding on the edge of the frame plate that is the front of the driver cockpit area and moving the top of the driver's side inner footbox panel inwards, the upper part of the engine now has the clearance it needs. The driver's side header is touching the footbox but I think that is because I have two layers of dynamat there on the outside. If I remove the dynamat at that point and put some on the inside I think that will be alright.
Even though it was something like 10pm, I was excited to have this in so I kept going and put on the drive shaft which connects the transmission to the rear differential.
Sunday, March 16, 2014
Oil Filter Relocator
March 16, 2014 -
Today I put in the oil filter relocator. I read online that some folks have put on a short oil filter and not used the relocator. I decided against that for two reasons, one you are pushing oil through a smaller filter, but more importantly, two, if you aren't using shims on the engine mounts then even the short filter can be difficult to change out with regards to clearance issues. I thought I would rather do a little work now and make the future oil changes easy. Unfortunately the rounded crossed tubes where you are supposed to mount the oil filter relocator don't offer a nice place to drill and mount the three holes. So I used some scrap aluminum and made a brackets which I riveted to the cross members. Than I bolted the relocator on the bracket. I think it came out nice. We will see when the engine goes in....

Today I put in the oil filter relocator. I read online that some folks have put on a short oil filter and not used the relocator. I decided against that for two reasons, one you are pushing oil through a smaller filter, but more importantly, two, if you aren't using shims on the engine mounts then even the short filter can be difficult to change out with regards to clearance issues. I thought I would rather do a little work now and make the future oil changes easy. Unfortunately the rounded crossed tubes where you are supposed to mount the oil filter relocator don't offer a nice place to drill and mount the three holes. So I used some scrap aluminum and made a brackets which I riveted to the cross members. Than I bolted the relocator on the bracket. I think it came out nice. We will see when the engine goes in....
Driver Footbox part 1,000
March 15, 2014 -
Today my Dad came over and helped me finish putting on the top edge of my driver's footbox inner panel bump out. I don't think I could've done this by myself as one person (me) had to push *really* hard on the aluminum panels to get them close while the other drilled and riveted them. So I big thanks to Dad! Take a look at the engine bay side :

And here is the view from the inside:
Today my Dad came over and helped me finish putting on the top edge of my driver's footbox inner panel bump out. I don't think I could've done this by myself as one person (me) had to push *really* hard on the aluminum panels to get them close while the other drilled and riveted them. So I big thanks to Dad! Take a look at the engine bay side :
And here is the view from the inside:
Tuesday, March 11, 2014
Accelerator Pedal
March 10, 2014 -
Today I did more aluminum cutting. Once the battery died from that I thought another thing I could get started on was the accelerator pedal. For the Coyote setup, you have to cut up the pedal that comes with the Coyote and merge the Factory Five pedal to it. I did the cutting up of the Coyote pedal and mounted it but you won't see a spot for your foot because I haven't put the Factory Five pedal onto it yet. You might also notice some of the aluminum cutting in the photo below.

Today I did more aluminum cutting. Once the battery died from that I thought another thing I could get started on was the accelerator pedal. For the Coyote setup, you have to cut up the pedal that comes with the Coyote and merge the Factory Five pedal to it. I did the cutting up of the Coyote pedal and mounted it but you won't see a spot for your foot because I haven't put the Factory Five pedal onto it yet. You might also notice some of the aluminum cutting in the photo below.
Monday, March 10, 2014
Return Fuel Line
March 9, 2014 -
I titled this entry "Return Fuel Line" but really the last two weeks have been spent cutting aluminum with a Dremel which is really slow. I am trying to move the driver's side foot box inner panel to both make more room for the accelerator pedal and more room for the engine. I've done about 70% of the cutting so far. The Dremel battery only lasts about 10-15 minutes, so once it was empty on the last try I decided to get something else done. I put the return fuel line connector on the fuel pump, hooked up the flexible line, bent the hard line and riveted the hard line in place. You can see the end of the flexible line and the hard line running horizontal along the top in the photo below. (I don't think cutting aluminum offers many good pictures, hence the lack of posting.)

I titled this entry "Return Fuel Line" but really the last two weeks have been spent cutting aluminum with a Dremel which is really slow. I am trying to move the driver's side foot box inner panel to both make more room for the accelerator pedal and more room for the engine. I've done about 70% of the cutting so far. The Dremel battery only lasts about 10-15 minutes, so once it was empty on the last try I decided to get something else done. I put the return fuel line connector on the fuel pump, hooked up the flexible line, bent the hard line and riveted the hard line in place. You can see the end of the flexible line and the hard line running horizontal along the top in the photo below. (I don't think cutting aluminum offers many good pictures, hence the lack of posting.)
Subscribe to:
Comments (Atom)